Casting begins with the preparation of a pattern that you want to replicate. From this, an inverse mould is constructed. Raw material, traditionally molten metal, is then poured into the mould to take on the shape of the original pattern.
History
Moulding and casting is not a modern invention. So far, the earliest identified casting is a copper frog from Mesopotamia dating to 3200BC, but Biblical references imply the method was known in 5000BC and perhaps much earlier. For details of its more recent history in Europe, seehttp://www.metal-technologies.com/docs/default-source/education/historyofmetalcasting.pdf?sfvrsn=8.
What allowed moulding to evolve into the mass production technique of injection moulding was mainly mechanical automation, supported by the development of better materials to create the moulds and to inject into them.
Today, the original pattern may only exist on a computer screen, the moulds can be re-used indefinitely, and the raw material is often a plastic, glass, ceramic or resin. Moulds and injectors can be assembled to run in parallel on automated or fully robotic production lines.
The tools of an injection moulding company such ashttp://pnplastics.co.uk/ can produce thousands, or even millions, of identical products in each production run. Mass production and reusable tools enable castings to be supplied at prices unimaginable for our ancestors.
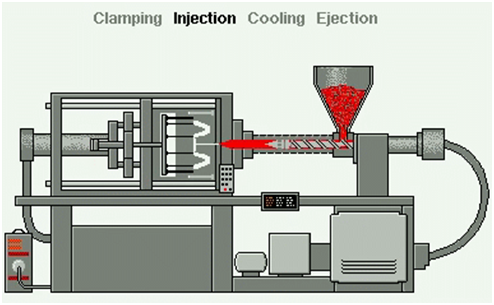
Step by step
Automated injection mould production usually begins with the delivery of the raw material from the hopper into the hot barrel of the injector where it is melted. A rotating screw helps to distribute it forward toward the ejection nozzle.

The material, now liquified by heat, friction and pressure, is forced toward the valve in front of the rotating screw. The screw itself is pushed backward as the material it is delivering accumulates in front of it.
The material is then force-injected into the pattern mould by a hydraulic ram applied behind the retracted screw assembly.
The moulding tool is held firmly closed by pressure until the plastic material inside cools and sets hard. This is often the most time-consuming part of the process, although some modern types of material can set very quickly.
Next, the screw is moved back to its starting position and is ready to repeat the moulding process. At the same time, the mould can be opened in order to eject the manufactured part.
Once the mould is firmly re-closed, the mechanism repeats the process.